Sunday, July 20, 2014

DIY Crochet Headguard

image

I crocheted this for my poor baby's forehead. She was five months back then. At this age, they bump their heads a lot of times. I know it's part of the learning process but I can't help but worry about her. Searched about Baby Helmets but they cost around Php 3k+ so I though why not make one.

How to do it:

1. Get the thickest yarn and biggest crochet hook that you have.

2. Measure around baby's head and create a base chain of that length.

3. You can use a Double Crochet or a Treble Crochet, whichever you want. I'm kinda impatient so I use the treble because it makes bigger stitches.

4. Crochet althroughout your base chain and double the width of the forehead.

5. Fold it in half horizontally and slip stitch or single crochet them together. You can make it thicker by doing triple the with and folding it three times.

6. Measure from one temporal area to another and create a base chain. Repeat the same procesa but only do 4 rows.

7. Slip stitch the guard part to the back part (other piece you just crocheted) and do the same on the other side.

Voila! Very inexpensive way to prevent bumpies on little baby's head or forehead at least.

***I own the rights to this pattern. You are free to sell whatever product you make out of it but don't sell the pattern as yours. Instead, link my blog as source if ever you're gonna use it as reference. Thanks.***

Spectra 3 Review

image

This is my darling sweetie pie posing with my reliable Spectra 3.

November of 2013, roughly two months after I gave birth, my thoughtful hubby bought me a Spectra 3 from babymama.ph to help me with my breastfeeding journey. My husband is really nosy and thorough when it comes to buying stuff. He researches about them real hard. Read reviews. Checks its value for his hard-earned cash. That's how he is. At that time I didn't had a clue of which breastpump to buy. Most breastpumps we researched about cost a lot. What we wanted was one that is affordable and reliable. He then told me that babymama had a pump that was around Php 4k+ and was really good. He showed it to me and then and there, he bought it.

image

My Pros:
*Very easy to use. You just plug and connect everything then you're all set.
*Easy to clean. You have less parts to clean than most pumps.
*It comes with a converter for big bottles, if you use Avent or such.
*Very affordable.
*Reliable. It has nice suction power. When I'm engorged, I can pump around 8oz in 10 minutes. No joke.
*Has a bottle holder to prevent spills. Never have I ever accidentally spilled pumped milk because of the holder.
*It is compact and can fit most bags but I would recommend you get a separate bag for your pump. You wouldn't want to ruin it. I have been eyeing on a bag I saw on babymama, the Arctic Cooler bag, it has a compartment for the pump and the cooler for you to put the milk. I think it's currently out-of-stock.

My Cons:
*Wish I can connect it via USB or car cigarette lighter for emergency pumping.
*Also, it would be much better if the flanges have different sizes ibstead of just the standard. Did a little bit of research and saw Spectra breastshield sizes. I don't think it's sold here yet.

Would I recommend it? Definitely definitely would. It is worth your money. If you're one of those kuripot moms like me, this is a great find. Just think about it, the whole breastpump just costs the same as one month worth of formula milk. With it, your baby can now get unli of the best milk ever. Mas tipid in the long run.

Just so you know guys, what I stated above are my own personal opinion. If you also want to get one, here is the link to babymama.ph's Spectra 3:
http://babymama.ph/products-page/bestsellers/spectra-3/

Happy breastfeeding! :)

Sexy moms breastfeed

The picture below was taken when my baby was three months old

image

I don't really know how much I weighed back then but this is how I look like now.

image

After six months from the last photo, this is me. Still a bit chubby on the arms but definitely sexier. I can't complain, my arms have been like that since I can remember. Haha.

My secret? Breastfeeding. Can't say aything more, but I will. I really made one of the best choices in my life by breastfeeding my baby since birth. I have to admit that there were a lot of bumps on my breastfeeding journey but everything was worth it because I am giving the best milk to my sweetie.

When she was a few days old, the lying-in where I gave birth did not promote the "Unang Yakap". When I was delivering my baby, I expected that after I push her out, she would be placed on top of me to breastfeeding but no. I remembered when I assisted in the Delivery Room of Quirino Memorial Medical Center, they promoted the Unang Yakap. After that, I lost consciousness and the nurse told my hubby to make formula milk for the baby, which he did. When we were already home, I tried and tried using a manual pump, letting her latch and all. Even got to a point that I broke down and cried because she doesn't want to latch. Ten months after all the hardwork and determination, she is still breastfeeding exclusively and is very healthy. Very proud that we were able to do it.

I realized that it's very important that you give your child what you think is best. Not what others think is best. I'm not one of those moms that shame moms that give formula milk because they breastfeed theirs. I remember even being shamed once on a breastfeeding group on Facebook for giving out an opinion. I just wish that they would stop that.

There are people who will hate because they think they are better than you but always remember that they can hate all they want, as long as you're happy, what they got to say don't matter.

I wish you luck on your breastfeeding journey. Smile sexy mommies. :)

Fisher Price Ocean Wonders Glow and Soothe Seahorse Review

Last week, I purchased from an online store in Facebook two items for my baby. A Soothe and Glow Seahorse and the Lil Sis Love to Play Puppy. I had already paid for it and everything and waited for about two weeks to get my order. I did receive the seahorse but not the puppy (which I really want). I was only going to buy the puppy but then thought my baby would love the seahorse since I had one like that when I was a baby (but mine was Garfield).
I purchased the seahorse for Php 950 and the puppy for Php 800 plus Php 50 additional for shipping (just hoping my hubby doesn't read this. He thinks I'm a shopaholic or something, but I'm not. Haha. Or maybe I am at times).

I was very excited when I got the toy because it looked so cute and it was in complete packaging and all.

image

image

Here are my yays and nays for this product:

Pros
*it looks sooo cute and it's very girly
*don't know if it's because of this toy but my sweetie somehow falls asleep faster
*it has a tummy light so I can still see my darling even when it's dark.

Cons
*volume to low. We've already set it to max but it is still not that loud. Maybe they set it at that because it's a toy meant for sleeping.
*aside from using it to sleep, that's it. Your child can grow tired with it after some time.
*you can't wash it entirely. Just surface clean it real quick.

That's about it.
What I stated above are my opinion and Fisher Price did not give me any products to make a good review about them. I don't even know if this is a good review or what.

Also, just so you know, the owner of the online store told me that she'd give me a refund for the puppy because when she went to her supplier, all the puppies they had were defective. Nice! I can spend it on something else like a birthday gift for hubby. <3

Doing your own hair color

Ten months after giving birth, I barely have any time for pampering myself. As you csn see on the picture below, my hair is already up to my waist (and that photo was from a few months back) and half of my hair is now black (which looks like "I-don't-have-time" to fix my hair or put on makeup or basically do anything). Honestly, exclusively breastfeeding, working at home, and taking care of chores is hardwork (however, my husband thinks otherwise).

image

So, I read a lot of blogs and watched a couple of videos in Youtube on how to color my own hair. Being a parent changes your life a lot. I've became super kuripot especially when I'm gonna spend the money in me. I'd rather spend it for my sweetie pie. Back to topic, I have very thin hair so even if I have very long hair, I didn't use as much hair coloring cream as I thought. Here is what I bought. (All products were purchased by me with my own money. This is not some endorsement review. All that I write here are my own opinion).

image

image

Here is what I did:
1. Comb your hair so it doesn't have any tangles. Don't shampoo your hair before dying it because it can remove the hair's natural oil and can leave it very dry after coloring it.

2. Divide your hair into 4 sections if you have thin hair like mine, or more, depending on the thickness of your hair. Clip all but one of the hair sections.

3. Start with coloring the first section (the one that you didn't clip) and work until you finish coloring all of it. I have short arms so I asked my husband to color the back part. Ask help if you need to.

4. Cover hair with a shower cap and leave it on as per the package instructions.

5. Wash it until water runs clear and condition, condition, condition your hair because it can dry your hair out.

Then, voila, new hair without spending thousands of pesos.

By the way ladies, when I bought the hair dyes from HBC, the cashier told me that they can color my hair for me since I went over Php 300.00. I, however, wasn't able to because the appointment was not til tomorrow noon and I have to go to a wedding. This is how my hair looks like now. (used Chestnut Brown by the way)

image

Friday, June 13, 2014

Sentiments from a stressed out mom (June 13, 2014)

Today was a very busy day for me. Thank God, I got to take a little chillax mommy time. Sometimes, you just have to rest.
My day started with cooking breakfast for Paul, my hubby, and our baby Jorgie. We had sunny-side eggs, chicken, sopas, and coffee. Jorgie ate a little bit but I'm happy, at least she ate. She has been sick since last week. I'll create a post about it.
My husband also works at home for a well-known search engine company that I cannot say. It's very nice to see him everyday, eat breakfast with him, and be with him always. We get to spend a lot of quality family bonding time together. The benefit of working at home.
However, sometimes it can be very stressing for me. You see, I work two jobs, take care of the baby, and do household chores. A lot of men would say that women who stay at home, don't do anything all day; which is the exact opposite. Earlier, I was able to clean the house, wash the plates, cook, do the laundry, all, while taking care of a sick baby. How tiring and stressing.
I worked a few hours in the morning for my Virtual Assistant job, and had a meeting with my other boss. There, I'm a researcher for a recently-launched Apple application (soon on Android).
Now, I just feel relieved that I was able to complete my tasks, and very blessed that Jorgie's recovering so fast.
A lot of us don't realize that our family is life's greatest blessing. Cherish every moment and always try to see the good in everyone.
Good night.

Monday, April 7, 2014

How to make malunggay powder

From my last post, I taught you guys on how to plant your very own malunggay tree. Now that it has grown leaves, I will be teaching you how to make malunggay powder. It is very easy to make and you can add it to just about anything.


  1. Gather malunggay leaves and remove the stems. Wash the leaves thoroughly and shake off excess water. (Alternative: Wash the leaves but don't remove them from the stem)
  2. Place leaves in a mesh net bag that you can buy at the public market. The leaves have to be air dried but not directly exposed to sunlight because it will lose its nutrients. Let it air dry for about three days. The mesh net bag looks like this: 


(Alternative: You can also hang them dry using a hanger with clothes pins. Don't forget to tie the end of the stems together using a rubber band or else they'll fall off and get dirty.) Then remove the leaves afterwards and proceed to the next step. You can hang them like this:


3. After three days or until it has completely dried, you can now roast the leaves under low heat for five minutes.


4. Now, you can use a blender or mortar and pestle to grind the leaves. 


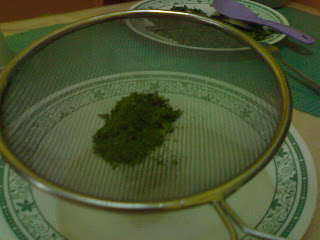
Then sift it afterwards.


Presto! You are now able to make your very own malunggay powder and it did not cost you anything. You can add this to almost any food or drink you want. 


If you're going to try this or have already did, I would love to hear how it came out or if you have any questions.

Credit to the owners of the photos used.